Replacing the FEP film (also known as a release liner) in your LCD resin 3D printer is a crucial maintenance step for maintaining print quality. This 3D printing FEP film can wear out, scratch, or accumulate cured resin over time, impacting print success rates and accuracy. Here’s a detailed guide on how to properly change it:
Tools & Preparation Before Replacing FEP Film in a Resin 3D Printer
Before you start replacing the FEP film, make sure you have the following tools and materials ready:
- New FEP film: Ensure the size and thickness are compatible with your printer model.
- Disposable gloves: To prevent grease from your hands from contaminating the FEP film and resin.
- Wiping cloth or lint-free paper: For cleaning.
- Isopropyl alcohol (IPA) or a specialized cleaning agent: For cleaning the resin vat and frame.
- Small screwdriver or hex wrench: For removing screws.
- Scissors or utility knife: For trimming the FEP film.
- Old towel or newspaper: To protect your work surface from resin drips.
- Non-metal scraper: For cleaning cured resin.
Step-by-Step Guide: How to Replace FEP Film on an LCD Resin 3D Printer
Empty and Clean the Resin Vat
- Remove the resin vat: Carefully take the resin vat out of the printer.
- Pour out residual resin: Pour any uncured resin from the vat back into its original bottle. (If the resin is clean and free of cured debris, you can filter and reuse it; otherwise, dispose of it properly).
- Clean the resin vat: Thoroughly clean the inside of the resin vat, especially the bottom and edges of the FEP film, using a small amount of IPA and a wiping cloth. Ensure all residual resin is removed. For stubborn cured residue, carefully scrape it off with a non-metal scraper.
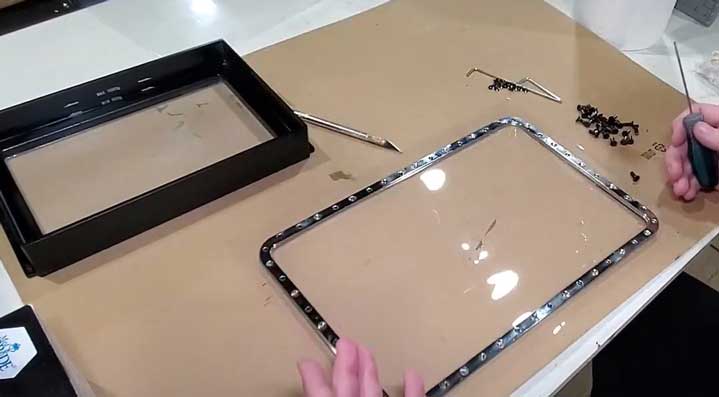
Disassemble the FEP Film Mounting Frame
- Observe the structure: The FEP film is typically held in place by a metal or plastic frame at the bottom of the resin vat. Carefully observe your printer’s resin vat structure; there’s usually a ring of screws that clamp the FEP film between two frame layers.
- Unscrew: Using the appropriate screwdriver or hex wrench, carefully loosen all screws on the mounting frame. It’s recommended to keep the screws organized for reassembly.
- Separate the frame: Once all screws are removed, carefully separate the upper frame (or clamping ring) and the old FEP film from the main body of the resin vat.
Remove the Old FEP Film
- Peel off the old film: Remove the old FEP film from the frame. Some FEP film might be quite adhesive and require a bit of force. This is often the point when to change FEP film if you notice it’s heavily worn.
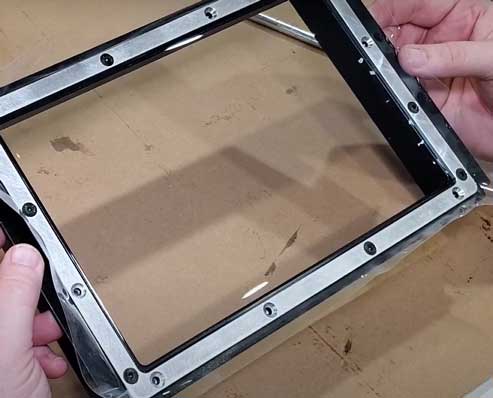
Install the New FEP Film
- Clean the frame: Re-check and clean the frame that holds the FEP film, ensuring no dust, fingerprints, or cured resin remain.
- Place the new film: Lay the new FEP film flat on the frame at the bottom of the resin vat. Note that FEP film typically has two sides, but most are indistinguishable. If you’re unsure, check the product instructions.
- Position the upper frame/clamping ring: Align the upper frame (or clamping ring) with the screw holes and gently place it on the FEP film, sandwiching the FEP film between the two frame layers.
- Tighten screws evenly:
- Cross-pattern method: This is the most critical step. Don’t tighten the screws all at once. Instead, use a “cross-pattern” method, gradually tightening them in multiple passes. For example, tighten one screw diagonally opposite to it, then another on a different diagonal, and so on.
- Even pressure: Each time you tighten a screw, only turn it a small amount. Ensure the FEP film remains flat under tension to avoid wrinkles or overstretching, which can affect print quality or even cause the film to tear.
- Check flatness: As you tighten the screws, gently touch the surface of the FEP film with your fingers to feel its flatness and tension. The correct tension means the FEP film surface is flat, with no noticeable slack or indentations, but also not overly tight to the point of deforming. This helps prevent damaged FEP film during installation.
Trim Excess FEP Film (If Needed)
- If the new FEP film is larger than the frame and has excess material extending beyond the edges, you can carefully trim off the excess using scissors or a utility knife along the frame’s edge. Ensure a clean cut to avoid frayed edges.
Final Inspection and Reinstallation
- Final check: Re-inspect the FEP film surface to ensure it’s flat, free of fingerprints, dust, and wrinkles. Gently press on the FEP film to check its elasticity.
- Reinstall in printer: Carefully reinsert the resin vat with the newly replaced FEP film back into the printer.
- Platform calibration: In some cases, you might need to recalibrate the print platform after replacing the FEP film to ensure the correct gap between the print layer and the FEP film. Refer to your printer’s user manual for specific instructions.
Pro Tips & Precautions for Replacing FEP Film
- Handle with care: FEP film is very delicate. Handle it with extreme care during the process, avoiding contact with sharp objects or scratching it.
- Wear gloves: Always wear disposable gloves to prevent oils and dirt from your hands from contaminating the FEP film, which can affect print results.
- Clean environment: Perform the replacement in a clean, dust-free environment to prevent dust from falling into the resin vat.
- Regular inspection: Even if you don’t encounter obvious printing issues, it’s advisable to regularly check the condition of your FEP film. You’ll know when to replace FEP film if you notice wear, scratches, or cured resin residue, then change it promptly.
- Refer to your manual: The FEP film replacement method might vary slightly between different brands and models of 3D printers. Before starting, it’s best to consult your printer’s user manual for specific steps and precautions.
