In the modern clinic, the adoption of digital workflow dentistry has shifted from a novelty to a necessity. While many practices have successfully implemented Intraoral Scanners (IOS) to replace physical impressions, a significant gap often remains: efficiently converting those digital files into physical models.
While traditional SLA printers historically dominated the market, LCD (MSLA) technology has emerged as a superior chairside solution due to its balance of speed, high resolution (often surpassing 50μm), and compact footprint. This guide outlines a precise, technical integration strategy to connect your IOS with an LCD resin printer, bridging the gap between data collection and manufacturing.
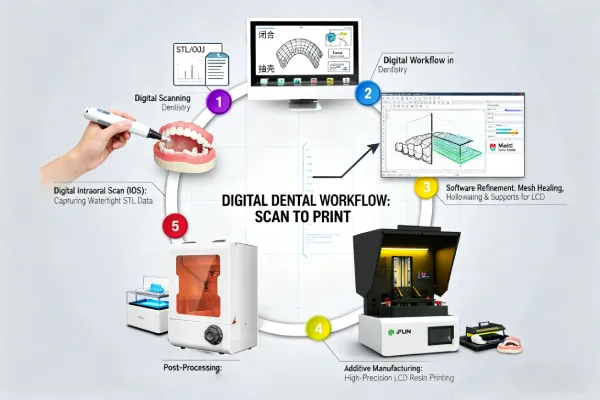
1. Data Acquisition: Mastering Digital Scanning Dentistry
The workflow begins before the patient leaves the chair. In the realm of digital scanning dentistry, the quality of your raw data dictates the fit of the final appliance. Unlike scanning for visualization, scanning for production requires strict adherence to geometry and continuity.
File Formats: The Universal Language
To ensure seamless integration with 3D printing software, you must understand your file exports:
- STL (Standard Tessellation Language): The industry standard for digital dentistry 3d printing. It contains only geometry data (shape and size). It is lightweight and compatible with 99% of slicing software.
- OBJ & PLY: These formats contain geometry plus color/texture data. While useful for patient communication or designing aesthetic restorations, the color data is unnecessary for printing standard diagnostic models or aligners.
The “Watertight” Requirement
A digital impression sent to a lab can sometimes have minor imperfections, but a file destined for a printer must be a continuous, “watertight” surface. When scanning, pay close attention to:
- Retromolar Pads & Buccal Corridors: Incomplete data here creates “holes” in the mesh.
- Bite Registration: Ensure the occlusion is captured accurately, as digital articulation errors are harder to correct physically later.
2. CAD & Data Preparation: Bridging Surface to Solid
This is the most critical step often overlooked by beginners. An IOS generates a “surface mesh” (a thin shell with zero thickness), whereas 3D printers require a “solid object.” You cannot simply drag a raw scan directly into a slicer.
Closing the Mesh
You must use bridging software (such as Medit Model Builder, Exocad, or Meshmixer) to “close” the mesh and extrude a base. Many modern printer slicers (like Alpha 3D or Chitubox) now include “One-Click Repair” features, but dedicated dental CAD software offers superior control over occlusion heights and labeling.
Hollowing for LCD Technology
Specific to LCD printing, printing solid blocks of resin creates massive suction forces (peel force) against the FEP film.
- Wall Thickness: Hollow your models to a 2-3mm wall thickness.
- Drain Holes: Always add drain holes near the base. This prevents the “suction cup effect,” reduces mechanical stress on the LCD panel, and saves approximately 30-40% in resin costs.
3. Slicing Strategies: Optimizing the Digital Workflow in Dentistry
LCD printers cure an entire layer simultaneously using a masked light source. To maximize the potential of the digital workflow in dentistry, your slicing strategy must differ from vector-based SLA printing.
Orientation Strategies
- Horizontal (Flat): Ideal for orthodontic models and aligner production. Because LCD printers cure the whole layer at once, printing 6 flat arches takes the same amount of time as printing one.
- Angled (30°–45°): Essential for high-precision indications like crown & bridge or implant guides. Angling the model moves support contact points away from critical margin lines and ensures the intaglio surface remains smooth.
Avoiding “Islands”
In your slicer, always analyze the model for “Islands”—isolated parts of the anatomy (often cusps of teeth) that start printing in mid-air before connecting to the main body. These are the primary cause of print failures.
4. The Printing Process: Calibration and Environment
Achieving clinical accuracy requires more than just hitting “print.” The chemical nature of resin requires environmental control.
- Resin Profiles: Do not guess exposure times. Use the manufacturer-validated profile for your specific “Dental Model Resin.” Over-exposure leads to model expansion (tight fits for aligners), while under-exposure causes loss of detail.
- Temperature Control: Resin viscosity changes with temperature. Keep your printing environment between 20°C–25°C (68°F–77°F). Cold resin flows poorly, leading to delamination.
5. Post-Processing: Locking in Accuracy
In a professional digital workflow dentistry setup, post-processing is a science, not an afterthought. The print is not chemically stable until this phase is complete.
- Washing: Agitate in 99% Isopropyl Alcohol (IPA). For hollow dental models, ensure the internal cavity is flushed thoroughly to prevent uncured resin from weeping out later, which is cytotoxic.
- Curing: Use a curing chamber with a turntable and specific light wavelengths (usually 405nm). This step is vital for biocompatibility and mechanical strength. Under-curing leaves the model soft; over-curing can cause shrinkage.
Conclusion
Integrating an LCD 3D printer with your intraoral scanner effectively closes the loop on digital dentistry 3d printing, allowing for same-day delivery of retainers, night guards, and study models. By mastering the transition from “Scan Data” to “Printable Solid,” you transform your practice from a data collector into an efficient manufacturing hub.