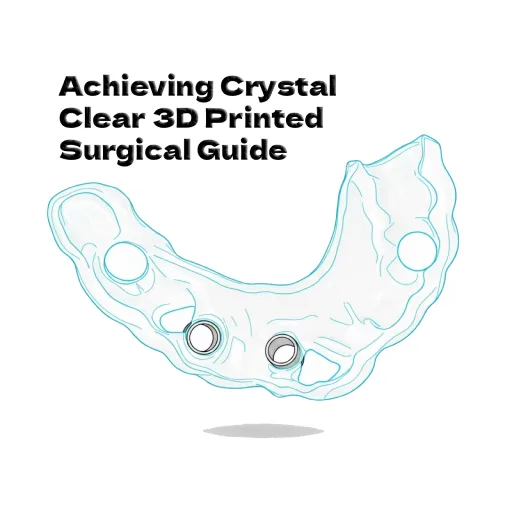
In modern dentistry, the clinical value of a 3d printed surgical guide lies in its precision and visibility. For surgeons, the ability to clearly visualize the operative field through a Transparent Surgical Guide is not just an aesthetic preference—it is a functional necessity for accurate placement. Whether you are producing a surgical guide for dental implants or complex orthopedic tools, clarity ensures safety.
However, when a dental surgical guide finishes printing on an LCD machine, it rarely looks transparent immediately. Instead, it typically appears “frosted” or translucent with a matte finish. This is normal. The “crystal clear” effect is achieved through a combination of correct material selection, precise print parameters, and disciplined post-processing techniques.
Here is a comprehensive workflow to optimize your 3d printed surgical guides for maximum optical clarity without compromising dimensional accuracy.
1. The Foundation: Resin Selection and Environmental Control
Achieving transparency starts before the printing begins. Not all clear resins are created equal, and the environment plays a significant role in the quality of your implant surgical guide.
- Choose Optical-Grade Resins: Select resins specifically formulated for high light transmission and non-yellowing properties. For medical applications, ensure the material is biocompatible (Class I or Class IIa) for intraoral use.
- Monitor Viscosity and Temperature: Low viscosity ensures smooth resin flow, reducing bubbles and layer-line artifacts. Resin flow improves with heat. Maintaining a printing environment between 25–30°C helps the resin settle faster between layers, reducing the risk of air entrapment in your 3d surgical guide.
2. Print Parameters: Balancing Speed and Quality
To reduce light scattering caused by layer lines, you must fine-tune your slicer settings. The goal is to create a surface that requires less aggressive sanding later.
- Layer Thickness: While thicker layers print faster, they create more visible “steps” that refract light. For a highly surgical guide, a layer thickness of 50 µm (0.05 mm) offers the best balance between print speed and surface smoothness.
- Wall Thickness Design: In the design software, ensure the guide walls are uniform (typically 1.5–2 mm). Excessive thickness increases the path length for light to travel, which can make the part appear cloudy regardless of post-processing.
3. The “Water Curing” Method (The Secret to Surface Clarity)
Once printed, standard UV curing in air often leaves the surface of a 3d printed surgical guide slightly tacky and cloudy. This is due to Oxygen Inhibition. Oxygen interacts with free radicals in the resin, preventing the very outer layer from fully hardening.
To bypass this and achieve a glass-like finish, use the Water Curing Technique:
- The Science: Water acts as an anaerobic barrier, blocking oxygen from the surface of the model while allowing UV light to pass through. This forces the resin to cure completely hard and smooth, significantly reducing light scattering.
- The Process:
- Clean the print thoroughly with IPA (Isopropyl Alcohol) to remove uncured resin. Let it dry completely.
- Submerge the surgical guide in a clear glass container filled with water.
- Place the container into your UV curing station.
- Cure Time: Reduce your standard cure time. Transparent resins are prone to yellowing if over-cured. Start with small intervals (e.g., 2–3 minutes) and check the results.
4. The “Dip and Cure” Technique (Restoring Optical Continuity)
For the highest level of transparency, you must eliminate the microscopic light refraction caused by layer lines. While sanding is common, it is risky for a surgical guide for dental implants as it can alter the precise fit on the patient’s teeth.
Instead, use the Resin Coating Method to fill these microscopic valleys:
- Step 1: After washing and drying (but before the final heavy cure), take a small amount of the same fresh, biocompatible resin used to print the guide.
- Step 2: Apply a thin, even coat of the resin to the non-fitting surfaces (the outer shell) of the guide. You can use a soft brush or quickly dip the part.
- Important Note: Be extremely careful NOT to pool resin on the intaglio surface (the inside part that touches the patient’s anatomy) or inside the drill sleeves. This preserves the accuracy of the implant surgical guide.
- Step 3: Allow gravity to level the resin for 10–20 seconds. This liquid flattens the surface optically.
- Step 4: Immediately cure the part (preferably using the Water Curing method above) to lock in the finish.
5. Combatting the “Yellowing” Effect
A major challenge with transparent LCD resins is their tendency to yellow after UV exposure. To maintain a pristine look for your 3d printed surgical guides:
- Avoid Thermal Shock: Do not use hot water for cleaning. Heat can accelerate the chemical reaction that leads to yellowing.
- UV Protection: Once the surgery is prepped, keep the guide out of direct sunlight or intense UV sterilization lamps for prolonged periods until immediately before the procedure.
- Auto-Correction (Photobleaching): Many modern dental resins feature “photobleaching” properties. They may look slightly yellow immediately after curing but will fade back to clear after 30–60 minutes of settling. Allow the part to rest before evaluating the final color.
Clinical Safety Warning
When pursuing transparency for any dental surgical guide, never compromise biocompatibility.
- Do not use standard “Clear Coat” spray paints or floor varnishes (like acrylics) to achieve a shine. These are not biocompatible and are unsafe for intraoral use.
- Only use the original printing resin or a certified biocompatible glaze (specifically designed for dental appliances) to coat the surface.
By following these steps—from selecting the right viscosity resin to mastering the water curing technique—you can consistently produce a Transparent Surgical Guide that offers superior visibility and surgical confidence.