The Digital Transformation of Precision Dental Casting
The lost-wax casting method remains the gold standard for producing high-strength, precise dental cast restorations—including crowns, bridges, and partial dentures. Traditionally reliant on meticulous hand-sculpted wax patterns, the process was time-consuming and prone to human error, often taking up to seven days to complete.
The introduction of 3D printing technology, specifically using specialized dental casting resins via SLA (Stereolithography) or DLP (Digital Light Processing), has ushered in a digital transformation. These 3D printed casting resins serve as digital, high-precision alternatives to traditional wax, significantly enhancing accuracy, efficiency, and repeatability.
This guide provides a comprehensive breakdown of the modern metal casting dental workflow, detailing the unique properties of casting resins, critical process steps, and integration points where digital methods meet traditional craftsmanship.
Section 1: Traditional Lost-Wax Casting and the Need for Digital Molds
The traditional lost-wax casting process in dentistry follows a precise sequence:
- Wax Pattern Creation: Hand-carving the restoration shape onto a dental die, defining the crucial margins and occlusal surface.
- Spruing: Attaching a wax or plastic sprue (casting channel) to the pattern.
- Investing: Encasing the pattern assembly within a metal casting ring using an investment material (a heat-resistant refractory compound).
- Burn-out: Heating the ring in a furnace to melt and completely eliminate the wax, leaving a clean mold cavity.
- Casting: Pouring molten dental alloy (e.g., gold, silver-palladium, or chrome-cobalt) into the cavity, typically via centrifugal or high-frequency induction casting.
- Finishing: Devesting, removing the sprue, and polishing the final metal dental cast.
Limitations: The heavy reliance on manual skill, a lengthy cycle (up to 7 days), and susceptibility to material shrinkage/distortion pushed the industry toward digital solutions to produce a more precise diagnostic cast dental pattern.
Section 2: Key Properties of Dental Casting Resin
3D printed dental casting resin is an engineered photopolymer designed specifically for investment casting. Its properties make it an ideal digital substitute for wax:
- High Accuracy and Detail Reproduction: Printed via high-resolution SLA/DLP, these resins achieve micron-level resolution. This is vital for reproducing intricate details like the occlusal anatomy and, most importantly, the marginal fit required for dental cast restorations.
- Near Zero-Residue Burnout: During the burn-out cycle, the resin must decompose almost entirely (pyrolysis) and gasify, leaving a clean mold cavity with minimal ash residue. This ensures a smooth metal surface finish and optimal alloy biocompatibility.
- Mechanical Stability: The resin offers adequate rigidity and thermal resistance, maintaining its shape stability during the investment and initial stages of the burn-out cycle.
Section 3: The 3D Printed Casting Workflow Step-by-Step Guide
The modern workflow integrates the precision of digital design with the proven reliability of the traditional lost-wax casting method.
Step 3.1: Digital Design and Preparation (CAD)
- Data Acquisition: Use intra-oral scanning or a model scanner to obtain the digital working file (STL).
- CAD Design: Utilize specialized dental CAD software (e.g., Exocad, 3Shape) to design the dental cast restoration (crown, bridge, framework). Design must account for proper wall thickness and functional anatomy.
- Model Optimization: The design is exported as an STL file, ready for the slicer software.
Step 3.2: 3D Printing the Casting Pattern
- Printer Selection: Use a high-resolution SLA or DLP printer compatible with dental casting resin (e.g., Formlabs, DWS).
- Parameter Settings: Use the resin manufacturer’s recommended settings for layer thickness (typically 25 to 100 micrometers), exposure time, and orientation to minimize support structure contact on critical areas like the margins.
- Support Structure: Supports are automatically or manually added to prevent deformation during the build process.
Step 3.3: Post-Processing Essentials (Cleaning, Curing, Support Removal)
This step is crucial for successful casting:
- Washing: The printed part is immediately cleaned in 95% or greater Isopropyl Alcohol (IPA) or Ethanol for 10 to 15 minutes, often using an ultrasonic cleaner or dedicated washing station to remove uncured surface resin.
- Drying: Complete air-drying is necessary. Residual solvent can compromise the investment material bonding, potentially leading to casting failures.
- Post-Curing: The model is cured under UV light (405 nm) and typically moderate heat (60 degrees Celsius). This step enhances the resin’s final hardness, dimensional stability, and significantly reduces residual monomers, which is critical for minimal ash burnout.
- Support Removal: Carefully remove support structures, preferably before post-curing, to minimize surface damage to the final pattern.
Step 3.4: Spruing and Investing
- Spruing: The resin patterns are attached to a wax trunk to form a casting tree. Proper spruing ensures a uniform flow of molten alloy and prevents turbulence. Ensure adequate spacing between patterns.
- Investing Material: Use a phosphate-bonded investment material, which is recommended for high-temperature alloys and compatible with dental casting resin.
- Investing Process: Mix the investment material according to the manufacturer’s instructions. Slowly pour the slurry into the casting ring, ensuring thorough vibration or vacuum to eliminate air bubbles and fully cover the pattern. Allow 24 hours for complete setting.
Step 3.5: Burn-out and Metal Casting
- Burn-out Cycle: The cast ring is heated in a furnace following a precise, manufacturer-recommended temperature curve.
- Low Temperature Phase: Slow heating (e.g., up to 300 degrees Celsius) allows the resin to soften, minimizing thermal expansion stress on the investment.
- High Temperature Phase: Rapid heating (e.g., up to 800 to 950 degrees Celsius) to completely combust the organic resin material, ensuring a completely clean mold cavity.
- Casting: The appropriate dental alloy (e.g., Cr-Co, Gold) is melted and injected into the mold cavity using a casting machine. Modern systems often use induction heating for superior temperature control.
- Cooling and Devesting: After cooling, the investment is broken away to retrieve the metal dental cast tree.
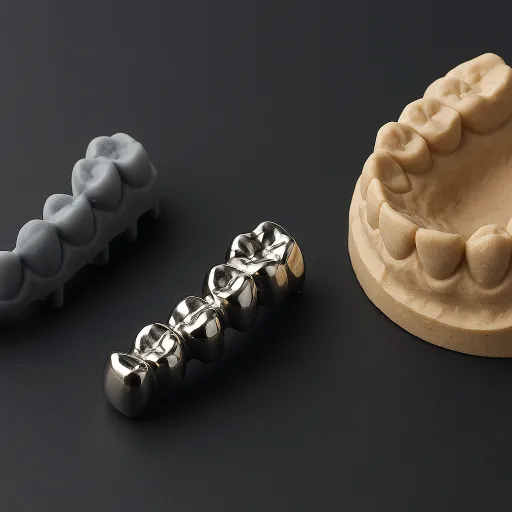
Step 3.6: Finishing and Quality Control
The final steps involve cutting the dental cast restoration from the sprue, grinding the sprue attachment point, and a final polishing process to achieve a smooth surface and optimal fit. Quality inspection is performed to verify marginal fit and surface integrity.
Section 4: Critical Integration Points for Optimal Results
Successfully fusing 3D printing into the lost-wax casting process requires attention to specific compatibility issues:
- Material Compatibility: The chosen dental casting material (resin) must be compatible with the investment material. Incompatibility can lead to surface defects or incomplete burnout. Always follow the resin manufacturer’s specific guidelines.
- Optimized Burn-out Curve: Resin patterns typically require a specific temperature ramping profile—different from wax—to prevent rapid expansion that could crack the investment shell. Temperature control is non-negotiable.
- Process Efficiency: The digital workflow significantly reduces the pattern-making cycle from days to hours, enhancing laboratory throughput and reducing the manual skill barrier.
3D Printed Casting Resin as the Future of Dental Cast Restoration
The use of 3D printed casting resin represents a significant advance in dental casting technology. By replacing labor-intensive wax models with high-resolution, digitally designed resin patterns, labs achieve superior accuracy, a drastic reduction in production time, and predictable, repeatable results.
While initial material costs for specialized dental casting material are higher, the long-term benefits of reduced labor, material waste, and minimized remakes quickly justify the investment. Embracing this digital workflow is essential for any modern laboratory aiming to deliver the highest quality dental cast restoration with unparalleled efficiency.