
I. Why 3D Printing Surface Defects Are a Critical Pain Point in Jewelry 3D Printing
Photocuring resin 3D printing has become widely adopted in jewelry casting, significantly expanding design freedom and production efficiency due to its excellent detail reproduction. However, the jewelry industry demands exceptionally high standards for the 3D print surface quality. Every minute detail, the smoothness of the finish, and the integrity of edges directly impact the quality of the final casting. 3D printing surface defects, even minor imperfections, not only compromise visual appeal but can also lead to casting failures, resulting in wasted materials and time.
This article aims to systematically categorize common 3d printing surface defects encountered in jewelry resin printing, explain their causes, and provide effective repair solutions to help jewelers confidently address these challenges and ensure every 3D printed model meets the stringent requirements for casting.
II. Common 3D Print Surface Defect Types and Their Causes
Understanding the root cause of a defect is crucial for effective repair. Here are some common 3D print surface defects and their origins:
1. Bubbles
Causes:
- Stirring resin improperly: Introducing air when pouring or stirring the resin.
- Air in resin: Poor resin quality or air contamination during storage.
- High ambient temperature: Elevated temperatures can reduce resin viscosity, making bubble formation more likely.
- Unleveled print platform: An unleveled platform can cause resin pooling in certain areas, trapping bubbles.
Identification: Transparent bubbles or blisters appearing on the 3D print surface or within the model.
2. Pits / Voids
Causes:
- Incomplete cleaning: Uncured liquid resin residue collapsing after cleaning.
- Support removal damage: Improper support removal tearing away small pieces of the model, leaving pits.
- Curing shrinkage: Uneven shrinkage of resin during the curing process can create tiny pits.
Identification: Small depressions or dot-like indentations on the 3D print surface.
3. Cracks
Causes:
- Unreleased print stress: Uneven resin curing or excessive internal stress during printing, which isn’t sufficiently relieved.
- Sudden temperature changes during post-curing: Abrupt exposure of the model to a cold environment after high-temperature post-curing, leading to thermal stress concentration and cracking.
- Prolonged exposure to dry air: Some resins may crack due to moisture loss if left in extremely dry conditions for extended periods.
Identification: Cracks appearing along edges or hairline fractures visible under light.
4. Warping
Causes:
- Uneven curing: Significant differences in curing speeds across different areas of the print, causing uneven internal stress.
- Insufficient base adhesion: Inadequate adhesion between the model and the 3d printer print surface, causing detachment during printing or post-curing.
- Poor model design: Large or flat models are more prone to warping, especially at the edges.
Identification: Lifted edges at the base of the model, where it doesn’t adhere flatly to the platform.
5. Rough Layer Lines / Uneven Banding
Causes:
- Low print resolution: Choosing a layer height that is too large, resulting in visible layer steps.
- Over or under-exposure: Incorrect exposure time leading to incomplete or excessive curing of each layer, affecting layer bonding.
- Unstable Z-axis: Uneven movement of the printer’s Z-axis, causing inconsistent layer heights.
Identification: Visible layer lines or an overall 3d print rough surface on the model. This is often an indicator of 3d print poor surface finish or 3d printing rough surface.
III. Detailed Solutions for Various Defects
Mastering effective repair techniques can significantly improve model usability and reduce waste. These techniques are crucial for achieving 3d printing smooth surface finish or improving surface finish 3d printed parts.
1. Repairing Bubbles
- Method 1: For isolated 3d printing surface bubbles, use a needle to prick the bubble, then gently scrape flat the area. Apply a small dot of UV repair resin to fill the void, and then perform localized curing with a UV pen light.
- Method 2: If there are numerous or widespread 3d printing surface bubbles, consider applying a thin, even coat of UV clear topcoat resin (such as specialized UV gloss coat or self-leveling resin) over the entire model 3d printing surface for sealing. Allow it to level, then perform overall UV curing.
Tool Recommendations: UV pen light, small spatula, UV resin (high transparency, low viscosity).
2. Repairing Pits / Voids
- Method 1: For small pits, perform localized spot filling. Use a toothpick or fine needle to apply a tiny amount of UV repair resin precisely into the pit, ensuring it’s filled, then perform localized curing. After curing, gently sand smooth with fine-grit sandpaper.
- Method 2: For areas with multiple small pits, an overall coat of a flowable transparent resin (like UV self-leveling resin) can be applied. Allow it to naturally level and fill all the pits, then perform overall UV curing again.
Caution: When filling, avoid creating new bubbles during the application process.
3. Repairing Cracks
- Method 1: For minor, hairline cracks, try infiltrating with low-viscosity UV glue. Position the model appropriately to allow the UV glue to seep into the crack via capillary action, then perform UV curing.
- Method 2: If severe cracks are present, especially in critical stress areas or key casting regions, reprinting the entire piece is strongly recommended. Deep cracks may not be fully repairable and could compromise the strength and integrity of the final cast.
Recommended Practice: Before repairing cracks, it’s advisable to perform an ultrasonic cleaning of the model and thoroughly dry it. This prevents dirt or uncured resin residue from remaining inside the crack, which could hinder effective UV glue adhesion.
4. Repairing Warping
- Method 1: For slight warping, use a heat gun (set to a low temperature) to gently heat the warped area. Once the resin softens slightly, press it flat with your hand or a flat tool, then immediately cool to set (using cold air or rapid cooling).
- Method 2: If warping significantly affects the model’s support stability or overall geometry, it’s recommended to redesign the support structure and reprint the model.
Additional Tip: Before printing, always check that the 3d printer print surface is properly leveled, and consider increasing the first layer exposure time to improve adhesion between the model and the platform, thus preventing warping.
5. Repairing Rough Layer Lines / Uneven Banding
- Method 1: Use fine-grit sandpaper (recommended 1000-2000 grit or higher) for wet sanding. With water, use the sandpaper to gently sand the 3d printing surface of the model, manually eliminating visible layer lines until the 3d printing smooth surface finish is achieved. This is a common method for surface finishing 3d printed parts and improving 3d printing surface finish.
- Method 2: You can opt to spray an entire coat of UV self-leveling coating or an epoxy coating. These coatings have good flow properties, can fill tiny layer lines, and form a 3d printing smooth surface finish after curing. This also contributes to better surface finish 3d printed parts.
Tool Recommendations: Sandpaper, sanding sticks, UV spray gun (if using spray coating).
IV. Pre-Printing Prevention Tips: Reduce Post-Processing Workload
Prevention is better than cure. Controlling defects at the source can significantly reduce their occurrence, leading to a better 3d printing surface finish.
- Choose High-Quality, Dedicated Jewelry Casting Resins: Prioritize resins specifically designed for jewelry casting, such as wax-filled resins (for clean burnout and minimal ash) or low-shrinkage resins (to reduce cracking risks in casting). These resins generally offer better curing stability, lower shrinkage, and fewer defects, improving the overall 3d print surface.
- Optimize Model Support Structures: Carefully design supports to minimize direct contact points with critical model 3d printing surface. Place supports in hidden areas that won’t affect aesthetics or subsequent processing, and ensure supports are sufficiently sturdy.
- Adjust Print Parameters: Based on resin properties and model complexity, increase print resolution (select smaller layer heights), precisely dial in exposure time (determine optimal values through testing), and maintain Z-axis stability (regularly check printer maintenance). These adjustments are key for achieving a better 3d printing surface finish.
- Use an Anti-Oxygen UV Curing Chamber: Invest in a curing chamber that provides uniform, all-around UV curing, preferably with anti-oxygen curing capabilities. This helps ensure complete model curing and avoids issues like “under-cured layers” or uneven curing, contributing to a better 3d printing smooth surface finish.
- Control Print Environment: Ensure a stable ambient temperature during printing to avoid drastic fluctuations. This helps prevent stress cracks due to thermal contraction or bubble formation caused by high temperatures. Also, keep the environment clean to minimize dust contamination, ensuring a cleaner 3d print surface.
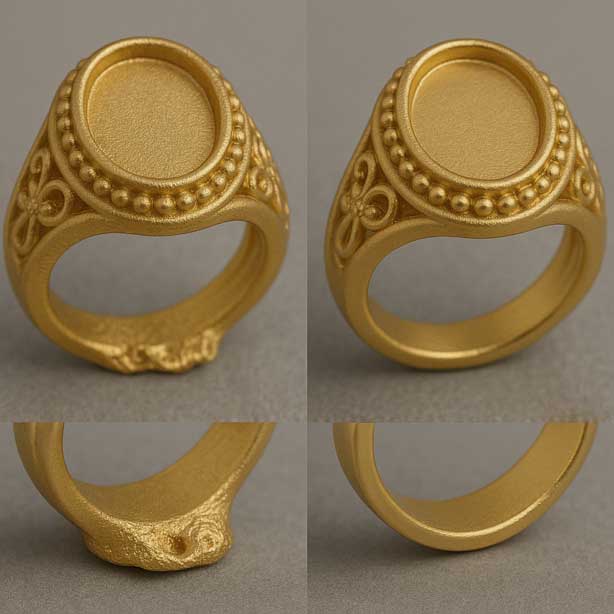
V. Before-and-After 3D Print Surface Repair (Illustrations)
Printed Part with Pits/Layer Lines Showing Poor Surface Finish
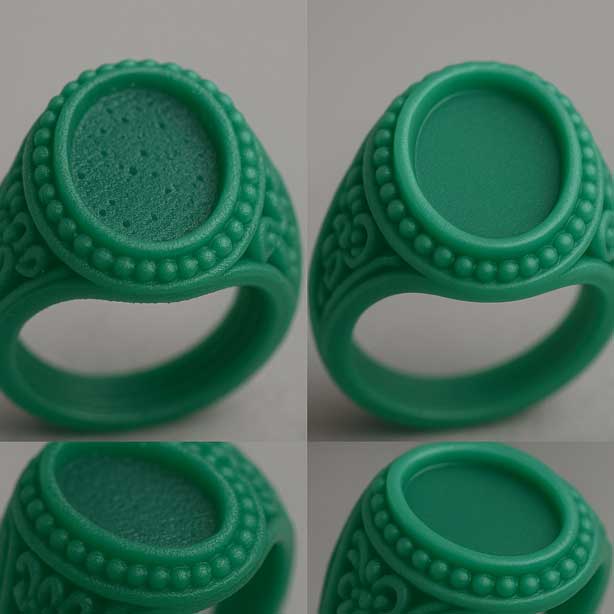
- Left: An un-repaired 3D printed jewelry model, showing visible pits and rough layer lines on its 3d printing surface, indicating a 3d print poor surface finish or 3d printing rough surface.
- Right: The same model after applying UV repair resin and sanding with fine-grit sandpaper, now featuring a 3d printing smooth surface finish. This demonstrates effective surface finishing 3d printed parts.
Castings Before and After Warping Repair
- Left: A casting failure example due to warping on the printed model. The cast piece shows noticeable porosity or deformation at the base, failing to meet final product requirements. This also highlights challenges when printing on metal surface with flawed models.
- Right: A successfully cast jewelry piece after the warped print was repaired (e.g., heat-pressed flat or reprinted). The base is flat and the piece is free of defects, showing successful printing on metal surface.
Illustrative Examples: Casting Failures if Not Repaired
- “Porosity”: Unrepaired pits or bubbles on the 3d print surface in the resin model can lead to metal porosity in the final casting, significantly impacting quality when printing on metal surface.
- “Metal Cracks”: Unrepaired cracks in the resin model can cause the metal part to crack or deform during the high-temperature casting process, affecting the integrity of the printing on metal surface.
VI. Recommended Tools and Materials Checklist
Here’s a list of commonly used tools and materials for surface finishing 3d printed parts and repairing 3d print surface defects in jewelry resin prints:
- UV Repair Resin Glue: Opt for highly transparent, low-viscosity, and fast-curing specialized UV repair resins.
- UV Curing Light:
- Pen-style UV light: For precise, localized curing; lightweight and portable.
- Small desktop UV curing chamber: For overall or larger area curing of models.
- Precision Sanding Tools:
- Dental polishing pens / Electric rotary tools: With various grinding bits for fine detail sanding, aiding in surface finishing 3d printed parts.
- Hand sanding sticks / Sandpaper holders: Used with fine-grit sandpaper for manual sanding of flat or curved surfaces, crucial for achieving 3d printing smooth surface finish.
- Sandpaper: Recommended wet/dry sandpaper in 1000, 1500, 2000 grit, or even higher, essential for achieving a good 3d printing surface finish.
- Anti-Bubble Spray / Vacuum Degassing Chamber (if applicable): For pre-treatment of resin before mixing or pouring to effectively reduce bubbles on the 3d print surface.
- Dust-Free Gloves: To prevent fingerprints and dust contamination on the model.
- Cleaning Swabs / Precision Wipes: For cleaning model surfaces and removing excess resin.
- Spray Bottle: For IPA (isopropyl alcohol) or anhydrous alcohol, used for cleaning and degreasing.
VII. Conclusion: Master Surface Repair, Elevate Your 3D Printed Jewelry
The allure of jewelry 3D printing lies in its ability to bring complex designs to life. However, to truly unlock its value, expert post-processing techniques are indispensable. Mastering the repair of 3d print surface defects on printed models is not just about aesthetics; it directly impacts the success rate of subsequent casting and the ultimate value of the finished product.
We encourage all jewelers to actively learn and apply the repair techniques provided in this guide, in conjunction with optimizing print quality from the source. By systematically preventing and repairing defects, you can establish a more efficient, professional, and flawless jewelry production workflow, ensuring every 3D printed jewelry piece has an excellent 3d printing surface finish and can achieve successful printing on metal surface.

