
In the jewelry 3D printing workflow, the printing process is only the first step. The true quality of a piece is determined during post-processing. For LCD resin curing, the goal is to reach the “optimal cure” where the resin is hard enough for handling and stone setting, but not so brittle that it cracks. This guide explores how to balance 3D printing post-processing to achieve professional results.
1. The “Green State”: Why Post-Processing is Mandatory
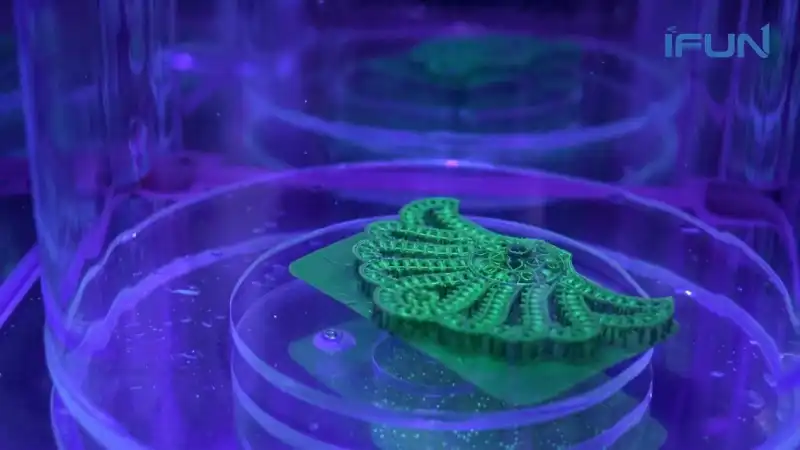
Every jewelry piece exiting an LCD 3D printer exists in a “Green State.” At this stage, the polymer matrix is only 80% to 90% reacted. The part contains unreacted photoinitiators and monomers, making it chemically unstable and soft. Precision post-processing is the final manufacturing stage that transforms this soft part into a stable jewelry master.
2. The Dangers of Undercuring: The “Sticky Trap”
Undercuring occurs when the UV curing time for resin is too short or the light intensity is too low. This leads to several issues:
- Removing tackiness from 3D resin prints: Undercured parts remain sticky because residual monomers stay on the surface.
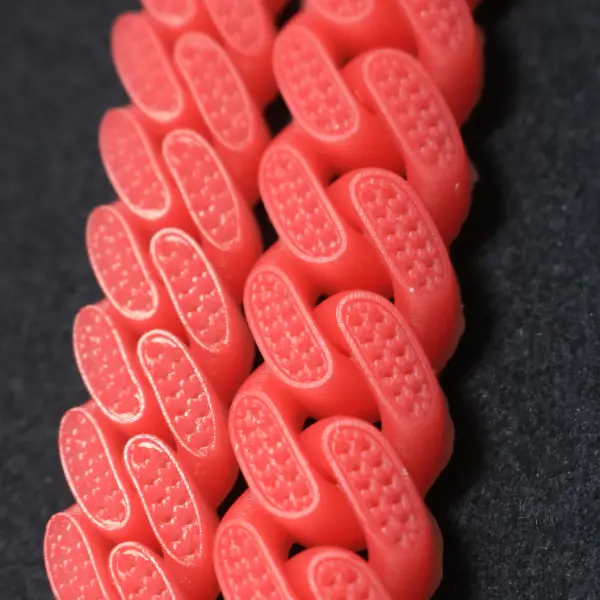
- Structural Creep: Thin features like filigree or prongs may warp under their own weight.
- Lost-wax casting 3D resin prep: Unreacted resin reacts with investment powder during burnout, causing gas porosity and rough surfaces on the final gold or silver casting.
- Cleaning intricate filigree 3D prints: If the part is undercured and not cleaned properly with IPA, the liquid resin trapped in gaps will solidify poorly, ruining the detail.
3. The Penalty of Overcuring: The “Glass Trap”
Overcuring happens when excessive UV exposure causes too much cross-linking. This creates internal residual stress and is the primary cause of resin shrinkage and dimensional accuracy loss.
- Resin Brittleness Fix: Overcured parts lose their impact resistance. If a piece snaps like glass when dropped, it is over-processed.
- Preventing cracks in LCD resin prints: Excessive curing leads to micro-cracks that are invisible until the piece is handled or heated.
- Resin prong strength optimization: For jewelers, overcuring is fatal during stone setting. Over-hardened prongs will snap rather than bend when securing a gemstone.
4. Key Parameters for Precision Control
To find the “Goldilocks Zone,” you must manage three specific levers during castable resin post-processing:
UV Light Intensity and Wavelength
- Most jewelry resins require a 405nm LED source. Ensure your curing station provides uniform light to avoid “half-cured” spots.
Best Temperature for Curing Jewelry Resin
- Heating the resin to 40°C–60°C during UV exposure increases molecular mobility. This allows the polymer chains to lock together more effectively, improving toughness and reducing the optimal Shore Hardness time.
Water-Bath UV Curing Benefits
- Oxygen inhibits the curing process on the resin surface. By using a water bath (Submerged Curing), you block oxygen. This results in a bone-dry, non-tacky finish and helps in preventing cracks in LCD resin prints by ensuring a more even cure.
5. Diagnostic: How to Tell if Your Cure is Correct
Use these simple tests to verify your jewelry 3D printing workflow:
| Test Method | Undercured Signs | Overcured Signs | Optimal Cure |
|---|---|---|---|
| Surface Touch | Sticky or oily feel | Chalky or very dry | Smooth and solid |
| Sound Test | Dull “thud” | High-pitched “ping” | Solid “clink” |
| Scratch Test | Fingernail leaves a mark | Surface is brittle/shatters | Resistant to light scratches |
6. Step-by-Step Optimization Workflow
- Thorough Cleaning: Use IPA or Ethanol to remove all liquid resin. Use compressed air to dry the part completely before curing.
- Incremental Curing: Instead of one long cycle, cure in 1-2 minute increments. This manages heat buildup and reduces resin shrinkage.
- Stone Setting Prep: If stone setting on 3D printed resin is required, favor a slightly shorter UV cycle combined with a longer thermal (heat) cycle to maintain prong flexibility.
Conclusion: Mastering 3D printing post-processing is a balance of chemistry and timing. By controlling the UV environment and temperature, you can eliminate tackiness and brittleness, ensuring your jewelry masters are perfect for both display and lost-wax casting.

