
I. Defining Layer Height and its Technical Background
Layer height refers to the thickness of each cured resin layer, measured in micrometers (μm). Typical resin printing layer heights range from 10 to 100 μm, significantly lower than FDM printing (which is usually ≥100 μm). This difference is due to the inherent characteristics of photopolymerization technology:
- Physical Limitations: 100 μm is often the upper limit for resin printing layer height, constrained by light scattering within the resin and liquid viscosity. 10 μm represents the current lower technical limit.
- Technical Advantage: Resin 3D printers cure liquid resin layer by layer using UV light. These minuscule layer heights allow for surface accuracy approaching that of injection-molded parts.
II. Direct Impact of Layer Height on Print Quality
1. Surface Smoothness and Stair-Stepping Effect
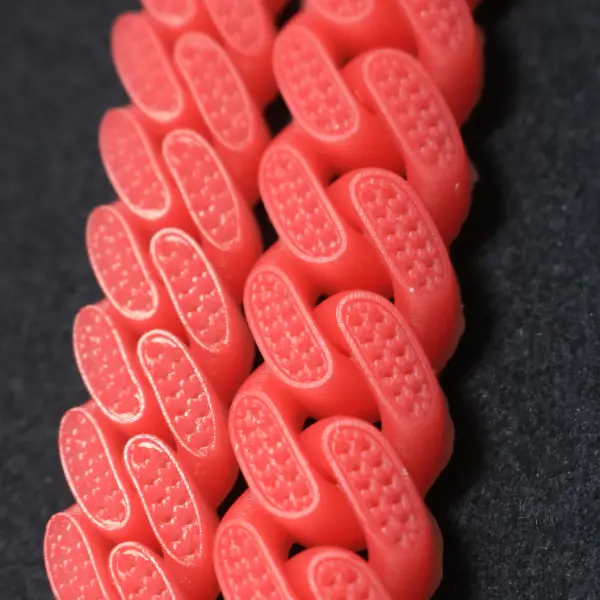
- Low Layer Height (10–25 μm): An increased number of layers creates smoother transitions along the Z-axis, significantly reducing the “stair-stepping” effect. A 10 μm resin printing layer height, combined with anti-aliasing technology, can eliminate visible layer lines, making it ideal for artistic pieces like sculptures and jewelry.
- Case Study: A terracotta skeleton model printed with a 10 μm layer height and 8x anti-aliasing took 3 days but showed no visible layer marks on its surface.
- High Layer Height (50–100 μm): The increased height difference between layers leads to noticeable “jagged” edges on curved and angled surfaces, requiring post-processing like sanding.
- Comparison Experiment: A model printed at 0.4mm layer height exhibited more than 300% higher surface roughness compared to one printed at 0.1mm.

2. Detail Reproduction Capability
- Fine Structures: A layer height below 25 μm can reproduce micron-level details such as strands of hair or intricate textures. For instance, the eyes or weapon engravings on a 28mm miniature model require a layer height of ≤25 μm.
- Angles and Curves: High layer heights result in pixelated edges on sloped surfaces, whereas low layer heights maintain contour sharpness.
- Illustration: A sphere printed with a 0.09mm layer height showed 40% clearer surface details than one printed at 0.3mm.

3. Structural Strength and Inter-Layer Bonding
- Layer Adhesion: A low layer height (e.g., 25 μm) ensures more uniform exposure for each layer, leading to tighter molecular cross-linking between layers. This can increase tensile strength by approximately 15% compared to a 50 μm layer height.
- Stress Concentration: High layer heights can create stress concentration points at layer boundaries, making the print more susceptible to delamination and cracking under impact.
III. Balancing Layer Height with Printing Efficiency
1. Print Time
- Inverse Relationship: Doubling the layer height typically reduces print time by 40–50%. For example:
- A 50mm cube: 0.1mm layer height requires 377 minutes 0.4mm layer height requires only 104 minutes.
- This is because, unlike FDM, resin printing has a fixed exposure time per layer. Total print time is roughly equivalent to the number of layers multiplied by the single-layer exposure time.
- Failure Rate: A resin print layer height below 25 μm can significantly increase print time, leading to a 23% higher hardware failure rate.
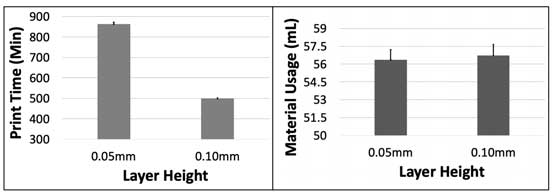
2. Material Consumption
Layer height has less than a 5% impact on material consumption (which is primarily determined by model volume). However, longer print times increase the risk of resin oxidation and deterioration.
IV. Synergistic Optimization of Layer Height with Other Parameters
1. Exposure Time
- Dynamic Adjustment:Decreasing layer height requires a corresponding reduction in exposure time (to prevent over-curing). For example:
- A 50 μm layer height needs 2.5s exposure a 25 μm layer height needs 1.8s.
- Failing to adjust can result in blurred details or brittle resin.
2. Support Structures and Orientation
- Overhanging Structures: A lower layer height can reduce support point diameters by 30%, minimizing the risk of damage during removal.
- Print Angle: Printing a model at a 45° angle with a 25 μm layer height can reduce support contact points by 40%.
3. Anti-Aliasing Technology
- Compensation Mechanism: Enabling 8x anti-aliasing with a 50 μm layer height can simulate the surface quality of a 25 μm layer height, saving 35% of print time.
V. Best Practices Recommendations
Layer Height Selection Guide
| Application Scenario | Recommended Layer Height | Expected Outcome |
| Functional Prototypes/Large Parts | 50 μm | Speed priority, moderate surface roughness |
| Display Models/Medium Parts | 25 μm | Balance of detail and efficiency (ChiTuBox default) |
| Miniatures/Precision Parts | 10–15 μm | Extreme detail, tolerate longer print times |
Calibration Steps
- Test Staircase Model: Print the same model with different layer heights in sections to observe quality boundaries.
- Exposure Calibration: Re-calibrate exposure time for every 0.01mm adjustment in layer height (using an XP2 validation matrix is recommended).
Hardware Adaptation
- Verify your printer’s Z-axis accuracy (stepper motor error should be <5 μm).
- For high-viscosity resins (e.g., ceramic-filled), a layer height of ≥30 μm is recommended to prevent delamination.
Conclusion
Layer height is essentially a tool for balancing precision and efficiency in resin printing:
- A layer height of ≤25 μm aims for ultimate surface finish, suitable for visually-oriented works.
- A layer height of ≥50 μm prioritizes functional realization, ideal for rapid prototyping.
The key is to compensate for the drawbacks of higher layer heights through techniques like exposure calibration and anti-aliasing, while also being mindful of the challenges that low layer heights pose to hardware reliability. Ultimately, the optimal choice should align with the model’s fundamental purpose—”unseen details don’t need micron-level stacking.”

